
To Download MXMonitor Click Here!
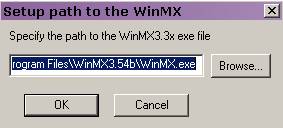
After you have downloaded the program and it begins its self installation you will have a box called 'Setup Path To WinMX' as seen below.
The path needs to be as shown here, if its not, you will click on the 'Browse' button and find program files, winmx, then WinMX.exe and click 'OK'.
Now that its installed its time to open it and get it ready for use. Once the box is open you will see three tabs: Logs, Transfers, and Settings. click on Settings Tab.
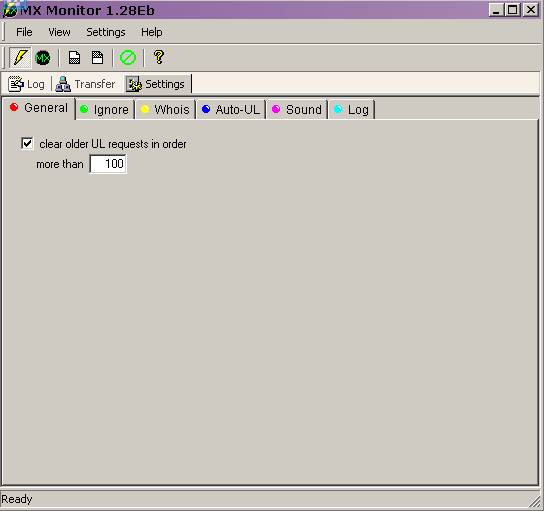
Under this tab are several other tabs. the first is the General Tab. Leave this at its default settings.
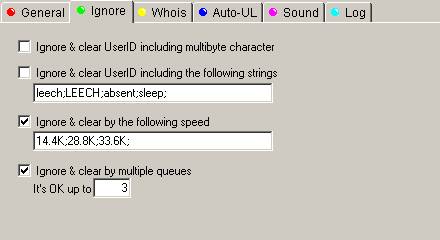
Next click on the Ignore Tab. This has ways for you to ignore users by:
1) The characters in their usernames. Leave this unticked.
2) By the words used in their names. (for example the ones shown) If you choose to do this you will need to tick this box.
3) By certain connection speeds they are using. Take the Unknown off the list and leave the rest as they are.
4) By the amount of slots they try to take up in your Que. This ignores those greedy folks, leave this ticked.
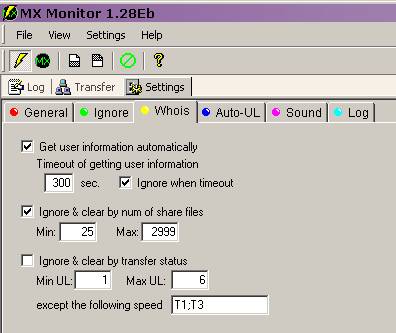
Now go to the Whois Tab. Here you set how the program will use the information it gets, from the Whois it looks at from each user.
1) This will need to be ticked for MXMoni to work. The default time is 100 seconds and leave the 'Ignore when timeout' ticked as well.
2) Ignores by the number of shared files a user has. You can set the min. to a number that you feel is fair. Leave the max. at the default setting.
3) Ignore by upload slots a user has available. This means that if someone has a lot of slots open, (which slows their downloads from you) that you can ignore these people. Tick this and leave it at its default settings.
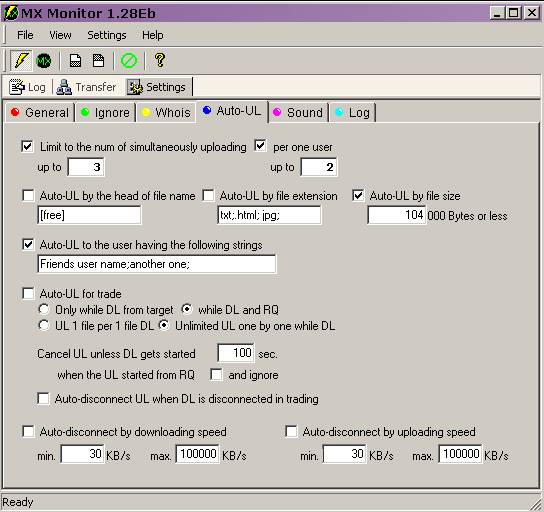
The next one to work on is the Auto-UL Tab.
This section allows you to let ppl upload from you even if your not there to start the file.
1)This option sets the amount of ppl that can get uploads automatically and how many per user. Below it is set to allow 3 files to start and set to 2 files per one user.
2)You can choose to allow auto uploads by the name of a file, the extension, or by the file size. Below you see we set this by file size to allow small files to be uploaded, as this will cover the extensions and names.
3)This allows you to set names of your friends you want to be started even if your not around. Below you see two usernames with a semi-colon ; separating them, this must be between each entry. This can also be set for part of a user name like a 'tag'.
4)This setting allows for ppl who trade files, as you may know I don't condone this practice and will not go into the settings. I believe this is a selfish practice.
5)The last setting allows you to auto disconnect by slow downloads or uploads. Leave these unticked as we know everyone can have slow moments of speed for various reasons.
The next is the Sound Tab. This is pretty self evident on how to install sounds for certain events. I found that quite annoying as there will be many 'bells and whistles' going off while you MXMoni is doing its thing. mine is turned off..
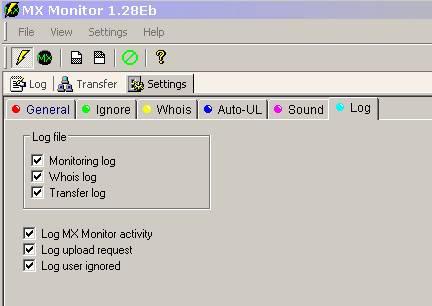
Last is the Log Tab. On this page you can set up how your MXMoni will keep logs.
The only one on this section you need to worry about is keeping a log of the ignored users. It happens quite often that a user you don't want ignored has gotten on this list for silly things as multiple que slots etc... This will keep them from being able to download from you or send messages. Its the first thing you should check if someone says their upload from you has timed out. Make sure your Moni didn't "bite them" by accident... .
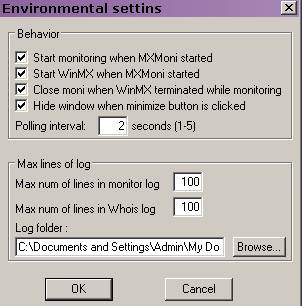
Now all of those tabs have been addressed we need to go to the other Settings at the top of the MXMoni box. Click on that and you will get a drop down menu, choose Environmental Settings.
Here under Behavior Make sure the first 3 boxes are ticked to allow, your MXMoni to start monitoring when you open it, allow it to start WinMX for you, and shut down your MXMoni when you exit WinMX.
Leave polling interval and Max Log Lines at their default settings as shown here.
This version of MXMonitor is compatible with WinMX 3.3x-3.5x. To my knowledge the ONLY concern with using this program along with WinMX 3.53 or above is a rare tendency to crash when you use the 'Clear Ignored Users' on the MXMoni screen as shown below. I personally have never experienced this and I have used that method of clearing often. You will need to clear this list as you will find that it gets quite long rather quickly.
This can be done by removing them from the Ignore tab on the WinMX screen if you have problems with the function on MXMoni.